
← Human Anatomy and Physiology Practicals
Demonstration of a urine pregnancy test
1. Aim
To perform a supervised qualitative urine hCG test with instructor-approved control material, read the device's control and test indicators, and record a valid or invalid teaching result. [1, 2]
2. Requirements
A locally approved, in-date qualitative urine pregnancy-test device; its current manufacturer instructions; instructor-supplied positive and negative control material or approved simulated specimens compatible with the device; labelled clean containers and transfer tools if required; timer; gloves; eye protection where required; and appropriate waste containers. The device brand, sample compatibility, control material, sample amount, timing window, storage conditions, and disposal rule are specified in the exact kit instructions and local laboratory procedure. Do not use a person's sample for this teaching exercise without a separate approved protocol. [2, 3]
3. Theory
Urine pregnancy tests detect human chorionic gonadotropin, usually written hCG, qualitatively. Many devices use a lateral-flow format with a control indicator that shows the test ran as designed. The meaning of a test line or symbol depends on the device, so the package instructions govern interpretation. A missing required control indicator makes the result invalid. Early testing, dilute urine, timing errors, or mishandling can yield misleading results. A teaching control result is not a diagnosis for a person. [2, 3, 4]
4. Procedure
- The instructor confirms that the device and control material are approved for the exercise. Check expiry date, packaging, storage instructions, and compatibility of the control material. The exact product and controls are specified in your college lab manual and instructor's method sheet. [2, 3]
- Read the complete manufacturer instructions before opening the device. Identify the sample area, result window, control indicator, required sample amount, and allowed reading interval. These kit-specific details are specified in your college lab manual and instructor's method sheet; do not substitute a generic drop count or wait time. [2, 3]
- Label separate devices for the instructor-supplied positive and negative controls if both are available. Put on required protective equipment and keep the control materials separate. The local quality-control plan is specified in your college lab manual and instructor's method sheet. [3]
- Apply the assigned material to each device exactly as instructed by its manufacturer. Start a timer at the specified point. Do not move or read the device outside the stated window. Sample transfer and timing are specified in your college lab manual and instructor's method sheet. [2, 3]
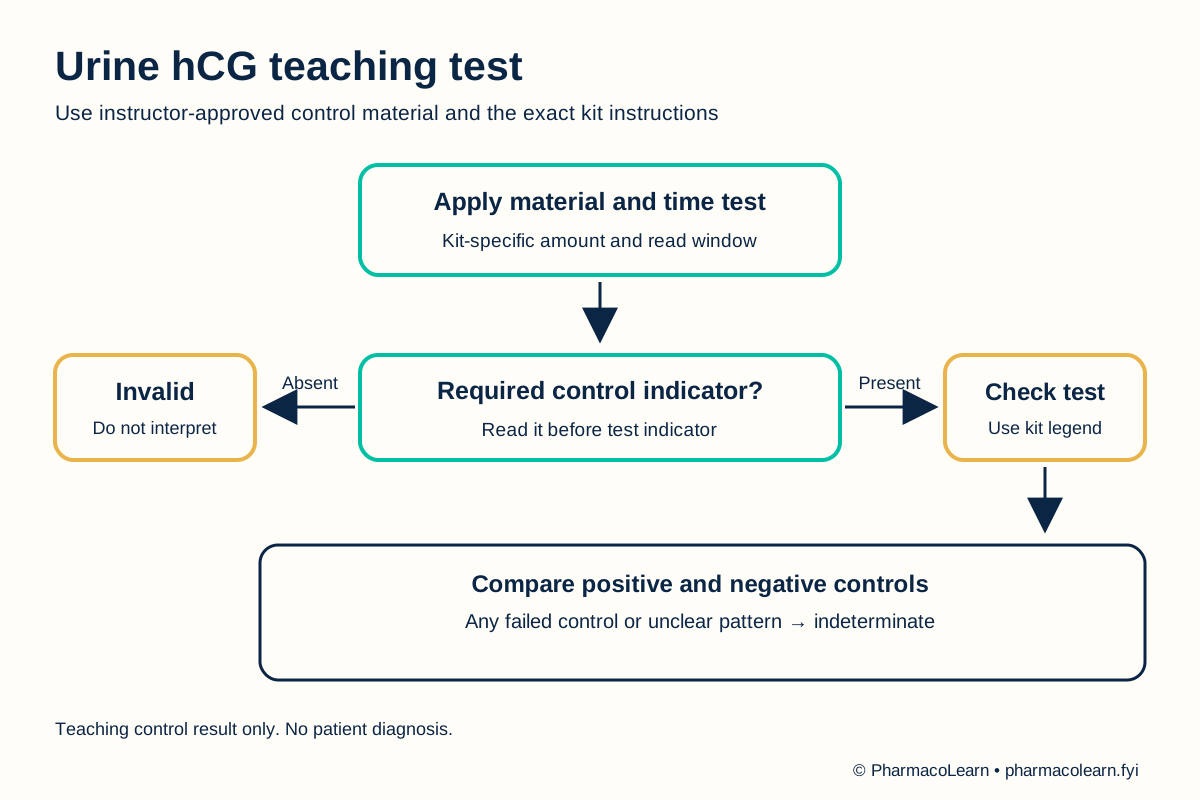
- At the specified reading time, check the required control indicator first. If it is absent or unclear, record invalid and ask the instructor to investigate. Do not interpret the test indicator on an invalid device. [2, 4]
- If the control indicator is valid, read the test indicator using the exact device legend. Record the positive-control and negative-control outcomes separately. If controls fail or the pattern is uncertain, report indeterminate and do not report a specimen result. [2, 3]
- Dispose of used devices and materials according to the local route, clean the work area, remove gloves, and wash hands. Record the kit identity, lot and expiry where the local procedure requires them, plus any deviation. [3]
5. Calculation, graph, or images as appropriate
No numerical calculation is required. The table illustrates a common two-indicator format only; the actual kit's legend must be followed and record its control validity criteria from the manufacturer's current instructions in the student record. [2, 4]
| Required control indicator | Test indicator | Generic teaching interpretation |
|---|---|---|
| Present | Present | hCG detected in the tested material, if controls pass |
| Present | Absent | hCG not detected by this device, if controls pass |
| Absent or unclear | Any appearance | Invalid; do not interpret |
Worked reading example: A labelled positive-control device shows its required control and test indicators, while the negative-control device shows only its required control indicator. If that pattern matches the kit's legend, record controls acceptable. Record the actual observed indicators here; apply only the kit-specific interpretation supplied by the manufacturer. This example is not a patient's result. [2, 4]
6. Result
Device and control identity: Record here. Control validity: Record here, using the kit-specific criteria. Positive-control outcome: Record here. Negative-control outcome: Record here. Report only the teaching control results. Do not use this exercise to confirm or exclude a person's pregnancy. [2, 3]
7. References
- Pharmacy Council of India. Pharm.D. Regulations, 2008, Appendix A. Lists the pregnancy diagnosis test practical.
- U.S. Food and Drug Administration. Pregnancy. Urine hCG detection, kit dependence, and limitations.
- U.S. Food and Drug Administration. How You Can Get the Best Results With Home Use Tests. Instructions, expiry, timing, sample amount, and records.
- National Library of Medicine. Pregnancy Test. MedlinePlus Medical Tests. Control indicator and result interpretation.
Back to Human Anatomy and Physiology Practicals · All Pharm D Practicals · Pharm D
Theory notes: Human Anatomy and Physiology